

With remote podcast recording platforms like Riverside or SquadCast, you can capture interviews with subject matter experts from anywhere in the world. Building connections with industry influencers, prospects, and customers from the comfort of your home office has never been more accessible.
But even though remote podcast recording platforms make capturing interviews easier, it’s still important to test out your setup before you hit record.
When recording a podcast remotely, you’re capturing HD video and audio over an internet connection. And you’re using your laptop (or desktop), microphone, headphones, video camera, and software all at the same time.
So when there’s an issue, you have a lot of different variables to work through.
In this article, we cover 10 key steps to testing your remote podcast recording software and equipment BEFORE you hit the record button. Here’s a breakdown of the steps:
- Identify all participants for the test scenario
- Create your recording session
- Invite your participants to the session & share materials
- Prepare your environment
- Enter the recording session and check your equipment in the green room
- Check the equipment & environment of other participants
- Simulate a real recording session and have a dialogue between you and the participants
- Conclude session
- Review files
- Run a second test
Why is simulating a real session important to testing podcast software and podcast equipment?
If you want to eliminate as many issues as possible before you record with your first guest, then you need to simulate a real session. Here are the major things you want to have in place when testing:
Use the same podcast equipment (microphone, headphones, etc.) you’ll use during your recording
When you use Riverside, Squadcast, or any other platform, it’s important to make sure your equipment connects and operates properly in a recording session. In some cases, you need to update your browser settings in order for devices to get recognized. In other cases, your equipment might need a software update.
Use the same environment you plan to use during your recording
A big part of how you look and sound comes from the environment you use to record. If you’re recording at the office predominantly, make sure you select a conference room or other isolated environment.
On the other hand, if you plan to record from home, make sure you pick a spot in your house that works well for podcasts.
By using your “normal” environment, you can make sure your internet connection is strong and your acoustics are acceptable.
Use the same computer
When you swap out devices and computers, you increase the chances of equipment failure. So when you go to test out your podcast recording process, pick the laptop/desktop you plan to use each time.
By using the same setup each time, you’ll be more consistent with your podcast recording quality. And you’ll get used to the equipment faster while also eliminating a lot of the variables that come along with recording HD video and audio over the internet.
10 key steps to testing your remote podcast recording software and podcast equipment
A lot of the podcast gurus state how testing is important to create a quality podcast recording session. But if you’re a relatively new podcaster and don’t record a lot of video content remotely, then you probably don’t have a checklist to use.
And if you show up to a recording session and stumble through your setup, it’ll destroy any confidence you have and make it more difficult to have a great interview.
But if you follow the 10 steps below, then you’ll get comfortable with your podcast recording environment and gain the confidence you need to hit the record button for the first time.
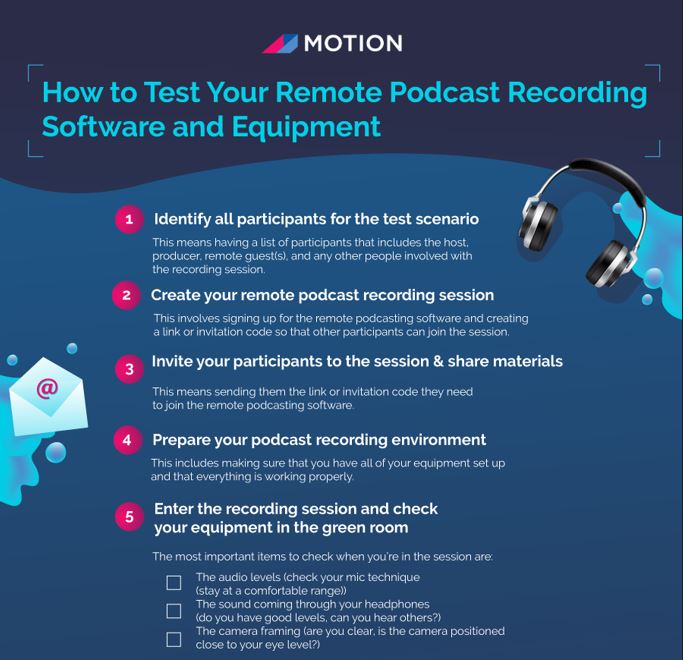
1. Identify all participants for the test scenario
Before you start testing, it’s important that you identify who will participate in the test. This means having a list of participants that includes the host, producer, remote guest(s), and any other people involved with the recording session.
When you use remote podcast recording software, sometimes the platform provides different functionality for each role. For example, when you’re a guest joining a session in Riverside, you can’t hit the record button.
So it’s crucial to get all of your roles identified and have different individuals filling those roles for the test scenario.
2. Create your remote podcast recording session
Once you have identified all participants for the test scenario, you need to create a remote podcast recording session. This involves signing up for the remote podcasting software and creating a link or invitation code so that other participants can join the session.
When you go through this step, you make sure you understand how the session is established for different roles. And you confirm the exact link that needs to go out to the various participants.
3. Invite your participants to the session & share materials
Now that you have a remote podcast recording session established, it’s time to invite your remote guests and any other participants. This means sending them the link or invitation code they need to join the remote podcasting software.
When we send invites to guests for Recorded Content, we use Calendly to facilitate a time that works for everyone. In your case, use the same business process you plan to use for your guests.
In addition to the podcast session link, it’s important to share any prep materials as well. We include a Guest Guidelines document when we set up a podcast recording session. The Guest Guidelines document provides background on your podcast, identifies the theme for the episode, and includes an outline of how we plan to structure the conversation.
4. Prepare your podcast recording environment
Before you jump into the remote podcast recording software, it’s important to prepare your own environment. This includes making sure that you have all of your equipment set up and that everything is working properly.
In addition to your equipment, what does your background look like? Do you have a large bright window behind you? What else is in your frame? Do you have sufficient lighting on yourself or do you perhaps need a soft key light?
Audio is also important to consider. Although audio can be adjusted in post-production, the best thing you can do to get great audio is to create a suitable environment. When you record a podcast, you want to avoid a large open room with hard surfaces. Instead, you want a room with furniture, carpeting, and other elements in the room to absorb sound.
Here’s a specific checklist you can use before you join your session:
- Put your phone on silent mode
- Turn off computer notifications (Slack, etc)
- Close all apps if you can (especially those taking up a lot of RAM)
- Restart your computer
- Check your internet connection (use a wire connection if at all possible)
- Make sure you have at least 2GB of free storage on your computer
- Get a glass of water (no ice)
- Don’t sit in front of a window
- Make sure you’re in a quiet spot in your home or office environment
- Get a notebook/notepad to capture notes
5. Enter the recording session and check your equipment in the green room
After you join the recording session, you need to confirm your live setup. SquadCast provides a “green room” where you can record a sample video before you enter the session. But other platforms like Riverside still allow you to validate your equipment before you hit the record button.
The most important items to check when you’re in the session are:
- The audio levels (check your mic technique (stay at a comfortable range))
- The sound coming through your headphones (do you have good levels, can you hear others?)
- The camera framing (are you clear, is the camera positioned close to your eye level?)

6. Check the equipment & environment of other participants
Once your setup is comfortable and you have the confidence that you look and sound great, it’s time to switch focus to your guest(s).
A quick checklist of items to go through include:
- How are the mic levels of your guest?
- Do you have an echo?
- How are guests positioned within their camera frame?
- Can they hear you & other guests?
The most important thing to do is to make adjustments before you hit record. By taking a few moments at the beginning of your podcast recording session, you help avoid major issues during post-production.
7. Simulate a real recording session and have a dialogue between you and the participants
Once you have verified the remote podcast recording software and equipment of all participants, it’s time to start simulating a real remote podcast recording session.
This step is important because it allows you to get comfortable with interacting on camera and practice some of the most important parts of your podcast — like your intro, lead-in, and outro.
Practice asking questions, taking notes, and engaging with your guest. When you run through your podcast script in a simulated session, you’ll be more comfortable with the conversation with your first guest. Your guest will be more comfortable with you as a host, too.
8. Conclude the podcast recording session
It’s important to wrap up the remote podcast recording session properly. Make sure you stop recording and confirm files are uploading. When you use a platform like Riverside or Squadcast, you may need to keep your browser tab open as files finish uploading to the cloud.
Before exiting the session, go through any items you would with a normal guest.
- Confirm when the podcast episode will get released
- Identify any additional materials you need from your guest (profile picture, URLs to share in show notes, etc.)
- Pinpoint how you’ll keep your guest in the loop and what assets you’ll share from the conversation
At the end of a remote podcast recording session, you can also ask your guest for any feedback. This is a good time to get some qualitative input from someone who just got through a recording session.
9. Review audio and video files from your podcast session
Once your remote podcast recording session is wrapped, it’s time to review the audio and video files.
Start by reviewing the quality of the recording — make sure everyone can be heard and that audio levels are balanced. If possible, easily fix any minor issues with software like iZotope RX or Adobe Audition.
For video, review the framing and lighting of your remote podcast recording.
Once you go through the files, identify any major things you want to adjust. If something wasn’t quite right, make notes and figure out what steps you (or your guests) need to take to fix them.
10. Run a second podcast recording test
The last step in testing remote podcast recording software and equipment is to run another remote session with your guest.
You can use the same script or questions, but run it as a second test. This allows you to make any adjustments and ensure everything runs smoothly before hitting record for the real episode.
Practice makes (close to) perfect
If you’re looking for an efficient way to connect with industry influencers, customers, and prospects, remote podcast recording is a great option. With platforms like Riverside or SquadCast, you can easily capture high-quality audio and video interviews from anywhere in the world.
However, even though technology makes remote podcast recording easier, it’s still important to test your setup before you start with a “real” guest.
By doing a few test runs beforehand, you can identify any potential issues and ensure that your final product has the highest quality possible.
If you want to learn how other B2B podcasters are using remote podcast interviews, check out Recorded Content. In each episode, we highlight stories from marketers who are creating branded podcasts and using them as a way to power their entire content marketing strategy.


